Category: How to

  • How to Find and Delete Facebook Watched Video History (2024 Update)

    How to Find and Delete Facebook Watched Video History (2024 Update)

    How to Find and Delete Watched Video History on Facebook without stress…

    How to Locate and Delete Facebook Watched Video History

    It’s now easier than ever to find videos you’ve watched on Facebook. Thanks to Facebook for including the activity shortcut in the profile section, which allows you to go back and check your recently watched videos quickly, clear or delete their history, view photos, share likes, and do a variety of other things.

    You can do it on the mobile app, Facebook Web, or PC. This article will show us both methods.

    Also Read: Facebook Notification Settings and Facebook Notifications Troubleshooting.

    Facebook is one of the top social media platforms, with millions of interesting videos. You and I can watch those videos for entertainment, fun, education, learning, earnings, and more.

    About Facebook Watch

    Facebook Watch is a feature of the Facebook site and application dedicated to watching and interacting with video content.

    Watch Eligibility

    To feature on Watch, a video has to be uploaded by:

    • A Facebook page with at least 5,000 followers.
    • A verified account with at least 50,000 followers.

    Components of Facebook Watch

    There are three main components of Facebook Watch:

    Watch Feed:

    The Watch Feed is customized, displaying many interesting videos that suit each viewer’s preferences.

    Watchlist:

    People can use Watchlist to keep track of the videos from the Facebook pages they like. People can choose which pages appear on their watchlist based on their preferences.

    Social Enhancement:

    Facebook Watch is committed to fostering a community around video content with tools like Watch Parties, Page Parties, Premieres, and Live.

    How to Find and Delete Watched Video History on Facebook

    In this article, I will show you how to find, delete, or view the video you have watched on the Facebook app. Most importantly, please don’t forget to update your Facebook app to the latest version for full clarification.
    How to Locate and Delete Facebook Watched Video History

    You can easily access your Facebook watch history through your profile. You can delete your history for privacy reasons or your personal choice.

    How to Find and Delete Videos You Have Watched on Facebook Mobile App

    It’s really easy to find out what videos you have recently watched on your Facebook app on your mobile device or PC. Thanks for the Facebook activity log feature. Now it’s easier to access and manage things via the activity log.

    Facebook has updated its app, and the user interface is polished and unique now. They have added more filters and sections to the activity log.

    But finding the watched video history is difficult for most users in the latest update. Follow the steps below to learn how to find and delete watched video history on your mobile phone (Android and iPhone):

    1. Open the Facebook app and log in to your account.
    2. Tap your profile picture.
    3. Tap the ellipsis icon (three dots).
    4. Tap Activity Log.
    5. Scroll down and select Logged Actions and Other Activities, then select Videos You’ve Watched.
    6. You will see a list of all watched videos. If you want to delete a specific video or a few videos you watched at a certain time, tap the Filters button, tap Date, input the Start and End date, and then tap Done.
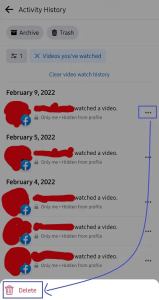
    7. Videos can be viewed by clicking on them or removed from your Facebook watch history by clicking the three-dot icon next to the video and selecting the Delete option.

    That’s it. Now, you can delete any of the videos from there with ease. Remember, the procedures for Android and iPhone users are quite similar.

    As a matter of importance, don’t forget to update your Facebook app to see these changes and find the above sections.

    In addition, to clear the entire watch history at once, click on Clear video watch history at the top of the page and follow the on-screen instructions to get it done.
    How to Find and Delete Watched Videos on Facebook using a PC or Facebook Web

    Suppose you are not using your Facebook account on mobile or the Facebook app. You can still manage and delete the watched videos on a Facebook desktop or web app. Follow the steps below:

    1. Visit the Facebook website via your web browser or open the desktop Facebook app and log in to your account.
    2. Tap your profile photo in the upper left corner to view your Facebook profile page.
    3. Click the ellipsis icon (three dots) and tap Activity Log from the drop-down menu.
    4. Scroll down a little, select Logged Actions and Other Activity, then select Videos You’ve Watched. [Additionally, to view a list of all the Facebook live videos you’ve ever viewed, keep scrolling down and tap Live videos you’ve watched.
    5. You will see a list or history of all the videos you have watched on Facebook. If you want to delete a specific video or a few videos you watched at a certain time, locate the Filters tab in the top left corner, tap Date, input the year, and then tap Save changes.
    6. Videos can be viewed by clicking on them or removed from your Facebook watch history by clicking the three-dot icon next to the video and selecting the Delete option.

    How to Clear All Watched Videos History at Once on Facebook

    You can delete all Facebook watched video history on a Facebook desktop or Facebook website (via your PC or phone browser) in one click. Follow the instructions below to learn how to delete all watched videos history on Facebook:

    1. Visit the Facebook website via your web browser or open the desktop Facebook app and log in to your account.
    2. Tap your profile photo in the upper left corner to view your Facebook profile page.
    3. Click the ellipsis icon (three dots) and tap Activity log from the drop-down menu.
    4. Scroll down a little, select Logged Actions and Other Activity, then select Videos You’ve Watched.
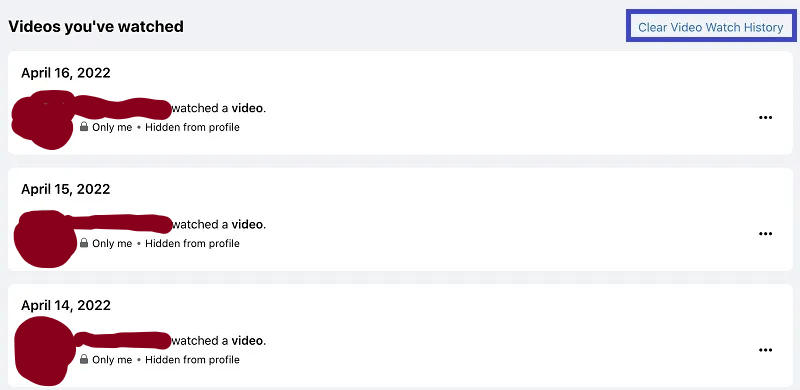
    5. Facebook’s watch history can be deleted entirely by tapping the Clear Video Watch History button in the upper right corner and confirming the action in the next pop-up window.
    Also see: How to Schedule Facebook Posts on Facebook

    Why should you Clear your Facebook Watch history?

    People may want to delete their Facebook watch history for various reasons. Here are a few of the most compelling reasons:

    1. Privacy Concerns

    Due to privacy concerns, some people do not want others to know what kind of video they have watched. As a result, they should clear the history to avoid any disgrace.

    2. Shared Devices

    If you share your device with another person, you probably don’t want them to look through your history list to see what videos you’ve watched on Facebook.

    How to Upload HD Photos and Videos on the Facebook App

    You can’t upload HD movies and pictures to Facebook from an iPhone or Android by default.

    Below are ways to fix that:
    • Launch the Facebook app on your phone.
    • Click the three white lines at the bottom of your iPhone. Click on the three horizontal lines at the top of your Android screen.
    • Select Settings & Privacy and then Settings from the drop-down menu.
    • Select Media and Contacts if you’re using an Android device. If you’re using an iPhone, go to Videos and Photos.
    • Under the Video and Photo Settings area, activate the following features:

    HD Video Upload

    HD Photo Upload

    That is all there is to it. You may now upload HD videos and pictures directly from the Facebook app.

    Note that you can return the default set by simply deactivating the options mentioned above.

    FAQ


    Can anyone see my saved videos on Facebook?

    No, your Facebook saved video is restricted to you alone unless you decide to share it with other users using the privacy settings “Public, Friends, or Contributors.” If this is the case, then users in that collection can access and make comments on the saved videos. It is recommended to restrict access to your saved items.

    How do I delete Facebook watch on my mobile device?

    • Log in to your account and select the three-dot icon to enter your profile menu.
    • Next, select Activity Log.
    • Navigate left to available activities to explore Videos watched.
    • Select Clear Video to delete the watch history.


    Conclusion

    This post is about finding and deleting Facebook Watch video history on the web and mobile applications of Facebook. Following the instructions above will make your Facebook-watched video history easily accessible.

    I will update this page if there are any modifications to these techniques.

    Please let us know if you have any questions or concerns.

    That’s all on How to Find and Delete Watched Video History on Facebook.

    I hope this article helps!

    Recommended:

    Facebook Classic Mode Settings | How to Switch Back to using Classic Facebook

    How to See My Blocked List On Facebook

    Play OMG Games On Facebook Messenger – OMG Messenger Game On Facebook Games

    How to Use Facebook Pay | Is Facebook Pay Safe?

  • How to Use Facebook Pay (2024 Guide) | Is Meta Pay Safe?

    How to Use Facebook Pay (2024 Guide) | Is Meta Pay Safe?

    How to use Facebook Pay | Is Meat Pay Safe?: Facebook now has a payment option built-in called “Facebook Pay.” It is now known as Meta Pay. And I couldn’t be happier to share this news with you.

    As Facebook becomes Meta, Facebook Pay becomes Meta Pay. If you already use Facebook Pay, take no action. MetaPay will use all of your existing Facebook Pay account details, payment methods, and settings.

    In the meantime, you may still be able to use Facebook Pay while the global rollout of Meta Pay continues.

    Facebook pay, as the name implies, is a payment tool on the Facebook website that is distinct from other payment apps you may be familiar with.

    Thankfully, it is also available on other social networking platforms like Messenger, WhatsApp, and Instagram.

    With Facebook or Meta Pay, you can send money to family members and business clients if they are Facebook friends or pals, donate to fundraisers, pay for things, and so on.

    All it requires of you is a debit card number, and you can easily make payments from any conversation. Interesting right? Thought as much.

    Due to the nature of the design of the Facebook Pay app, you can make payments across popular social networks and apps on Facebook.

    Check out: Facebook Marketplace Near Me

    Facebook Pay | Meta Pay

    Meta Pay is an easy, secure way to pay in more places than ever.

    Facebook Pay (Meta Pay) is a new payment feature that allows users to make purchases, send money, and donate to organizations through the Facebook platform.  The Pay service is quite similar to Google Wallet, Venmo, and Apple Pay which allows users to transfer money directly from their credit cards or bank accounts. 

    Today, you can use Meta Pay on Facebook, Instagram, WhatsApp and Messenger in your country. It’s also soon rolling out more apps in countries around the world.

    Meta Pay is available for people who have a payment method (e.g., credit card, debit card or PayPal account) to link to Meta Pay. Bear in mind that accepted payment methods may vary depending on the transaction type.

    Here’s how to use Facebook Pay: 

    How to Use Facebook Pay

    Setting up Facebook Pay:

    To start using Facebook Pay, you’ll need to set it up on your account. Here’s how:

    • On the Facebook app: Go to the menu and select “Settings & Privacy,” then “Settings.” Scroll down to “Payments” and select “Facebook Pay.” Follow the prompts to add a payment method and set up your security PIN.
    • Meta Pay is an easy, secure way to pay in more places than ever. Simply open Facebook, add your payment information, create a PIN, and you’re good to go.
    • On desktop: Open your Facebook profile. Go to “Settings” and select “Payments” from the left-hand menu. Follow the prompts to add a payment method and set up your security PIN.

    Making a purchase:

    Once you have Facebook Pay set up, you can use it to make purchases on Facebook, Instagram, and WhatsApp. Here’s how:

    • On the Facebook app: when you see an item you’d like to purchase, select “Buy” and choose Facebook Pay as your payment method.
    • On desktop: When you see an item you’d like to purchase, select “Checkout” and choose Facebook Pay as your payment method.

    Sending money:

    Facebook Pay can also be used to send money to friends and family. Here’s how:

    • On the Facebook app: Go to the conversation with the person you’d like to send money to, select the dollar sign icon, and enter the amount you’d like to send.
    • On desktop: Go to the conversation with the person you’d like to send money to, then select “Send Money” and enter the amount you’d like to send.

    Donating to organizations:

    Facebook Pay can also be used to make donations to charitable organizations. Here’s how:

    • On the Facebook app: Go to the organization’s page, select “Donate,” and choose Facebook Pay as your payment method.
    • On desktop: Go to the organization’s page, select “Donate,” and choose Facebook Pay as your payment method.

    Can I Trust Facebook Pay?

    There is no doubt that people tend to be extra careful with dealings related to money, but you have nothing to worry about; the service is safe and very secure.

    About a hundred more Facebook users have been using the Facebook pay feature to make purchases, with the app’s security being the sole reason for this.

    The service is also accepted in the Facebook marketplace. Facebook Pay has no fees and does not store money in an online account.

    Although Facebook has an existing service called Payments that works with Messenger, the Meta Pay service works with credit cards and will maintain a transaction history.

    The service must be individually set up for each of the apps. So signing up for the Meta Pay service on Instagram will not set up Meta Pay for WhatsApp automatically either. Therefore, you must set up Meta Pay for Facebook, Meta Pay for Instagram, and Meta Pay for WhatsApp to use this payment service with these apps.

    Also, MetaPay accepts most major credit cards, including Visa, Verve and MasterCard. Users can also connect their Meta Pay to a PayPal account.

    The service could trigger its own security and pushback among privacy watchdogs because of the company’s plans to make use of the transaction data of the people in its multi-billion-dollar ad business.

    How Does Facebook Pay Work?

    If you are wondering how the service works, well, below are tips on how it works;

    • The payment method is included by each individual before it is used to make payments on the Facebook app.
    • Facebook Pay can be set up app-by-app or can equally be set up for use across apps.
    • Payment history can be viewed by the user, methods of payment can also be managed, and settings can also be updated in one place.
    • A Facebook pay app user can get support from a real customer through a live chat.

    Payment with Meta (Facebook) Pay

    You can access the service in the settings section of your Facebook or Messenger apps. All you need to do is follow the steps below:

    • First and foremost, you have to head to the settings of your app. Or you visit the Facebook website and go to settings.
    • Go to the Meta Pay option.
    • Add a payment method of your choice (it varies with people).
    • You can now make payments with the use of your Facebook Pay when you want to make a payment.

    To summarize, if you want to learn how to use Facebook pay, go to the app’s settings and add your preferred payment method before beginning your transactions.

    Please note that Facebook Pay does not support RuPay or the Maestro card network.

    Accessing the Pay service is as simple as that. Once your Facebook Pay is available on your WhatsApp and Instagram, you will be able to set up each app.

    Is it safe to use Facebook Pay to make payments?

    Facebook uses state-of-the-art security measures to protect user data, including financial details. The following safeguards are in place for Facebook Pay:

    • An anti-fraud system that tracks payments made using Facebook Pay in order to identify any suspicious activity.
    • Payment card and bank account information are stored and encrypted using advanced technology.
    • Facebook Pay can alert you to suspicious behaviour.
    • To transmit money or make a payment, use a PIN, fingerprint, or facial ID. Facebook does not collect or retain biometric data. Some payments require no PIN or biometrics.

    More Security Tips for your Facebook Account

    To keep your account safe, take extra measures while sending and receiving money over Facebook.

    • Accept only payments from trusted people. Two-factor authentication (2FA) increases Facebook’s security.
    • Accepting friend requests from people you don’t know is a bad idea, even if the requests appear to come from “friends of friends.”
    • Cybercriminals breach your friends’ accounts to earn your trust. Beware.
    • Catfishing is a strategy in which they create a sophisticated fake online identity. They’ll send money-related messages through Messenger.
    • Con artists frequently utilize various schemes to defraud victims, including fake donations, fake lottery wins, fake love connections, fake loans, and fake inheritances.

    What is the procedure for creating a PIN?

    When making a purchase using Facebook Pay, you may be asked to generate a PIN (or use your device’s fingerprints) by selecting a four-digit numerical PIN. When making a purchase, a PIN number may be entered.

    In order to use Facebook Pay, you must have your PIN and biometrics set up. To do so, go to facebook.com/settings and choose “Facebook Pay.”

    As part of its security efforts, Facebook has the ability to immediately seek PIN verification before allowing certain types of transactions that appear to be anomalous behavior.


    What is the process for receiving money using Facebook Pay?

    If you’ve previously set up Facebook Pay, you’ll get a notification whenever anyone pays you cash.

    This will resemble the alert you’d get if you received an ordinary message, and it will validate the money being paid as well as the sender’s name.

    You won’t have to do anything to get the money; it’ll just show up in your connected bank or PayPal account right away.

    If someone sends you money and you do not have a Facebook Pay account, you will still receive a message asking for your card or PayPal information.

    Is Facebook Pay compatible with PayPal?

    Both Facebook Pay and PayPal allow you to send money to people and businesses.

    However, they are not the same thing. Facebook Pay is less robust than PayPal in terms of reach and app compatibility, despite Facebook’s own prominence as an online payment system.

    People who use Facebook and Messenger frequently, whether it’s to interact with friends or keep up with businesses, will likely find Facebook Pay to be very valuable.

    You’ll need a Facebook account to access Facebook Pay, which is true even if you wish to pay with Instagram.

    Even though this will likely change in the near future so that users don’t need a Facebook account to use the site, it still presents a barrier for people who don’t like Facebook.

    PayPal is more accessible and well-known around the world as a dominant player in digital and retail payments.

    While Facebook Pay is supported by a growing number of merchants, PayPal is accepted by a wider variety of stores across both aggregators and standalone websites.

    Facebook Pay is primarily used to make purchases from Facebook Marketplace and Instagram retailers.

    What’s the connection between Facebook Pay and Facebook itself?

    Facebook now offers a payment option through a service called “Facebook Pay.” This feature is currently accessible in select countries on Facebook, Messenger as well as Instagram and WhatsApp.

    Facebook Pay will continue to expand to more applications and regions, with the goal of reaching a larger audience over time.

    Is it necessary for me to have a Facebook account in order to use Facebook Pay?

    Facebook Pay is presently available on Facebook, Messenger, Instagram, and WhatsApp.

    You’ll need to have a Facebook account to use Facebook Pay, but you’ll be able to do it straight from other applications like Instagram and WhatsApp.

    Also, create a PIN (or use a fingerprint scanner on your device) to enter before a transaction is finalized for an added layer of security.

    What are the fees associated with Meta (Facebook) Pay?

    There are no fees from Meta when using Meta Pay. However, PayPal may charge fees to their users for certain types of transactions.

    Also, there may be fees charged to people who receive money for personal fundraisers or if they or businesses are selling items on Facebook.

    Benefits of Meta Pay

    With Facebook Pay, you can:

    • Input the payment method you prefer. Next, you can use Facebook Pay, if available, to carry out payments and purchases on Meta platforms, rather than inputting your payment data all the time.
    • Add payment app-by-app, or add it for the rest of the apps (where available)—this implies Facebook won’t instantly allow you to use Facebook Pay across the apps you are active on. It is optional.
    • Access the history of your payment, make changes to your payment method and change your settings in one place
    • Enjoy real-time customer support using live chat in the United States (and in several cities across the world in the future)
    • Access insight into which payment services are part of Facebook

    Hope you find this information helpful. Please use any of the share buttons below to share this information.

    Feel free to drop any questions or contributions regarding this article in the comment section below.

    Recommended:

    For more information, check out the following related articles:

    How to Use Instagram Login with Facebook

    Facebook Security Settings | Facebook Login Settings 2023

    How to Sell on Facebook Marketplace | How to Make a Sale on Facebook Market place


  • How to View Blocked List of Friends on Facebook

    How to View Blocked List of Friends on Facebook

    How to View Blocked Lists of Friends on Facebook—This article will help you discover how to check your blocked friend list on Facebook.

    Checking your blocked list of friends on Facebook should be a regular practice so that if you have blocked a friend unintentionally, you can quickly fix it

    Facebook has remained strong because its users can easily interact with each other. Blocking too many people won’t make the platform more interesting or fun, but getting rid of the annoying ones is important. How do you access the blocked list of Facebook users?

    Also see: How to View Blocked List And Unblock Friends On Facebook – How to Access Facebook Blocked Users Online

    How to View a Blocked List of Friends on Facebook for iOS or Android Devices

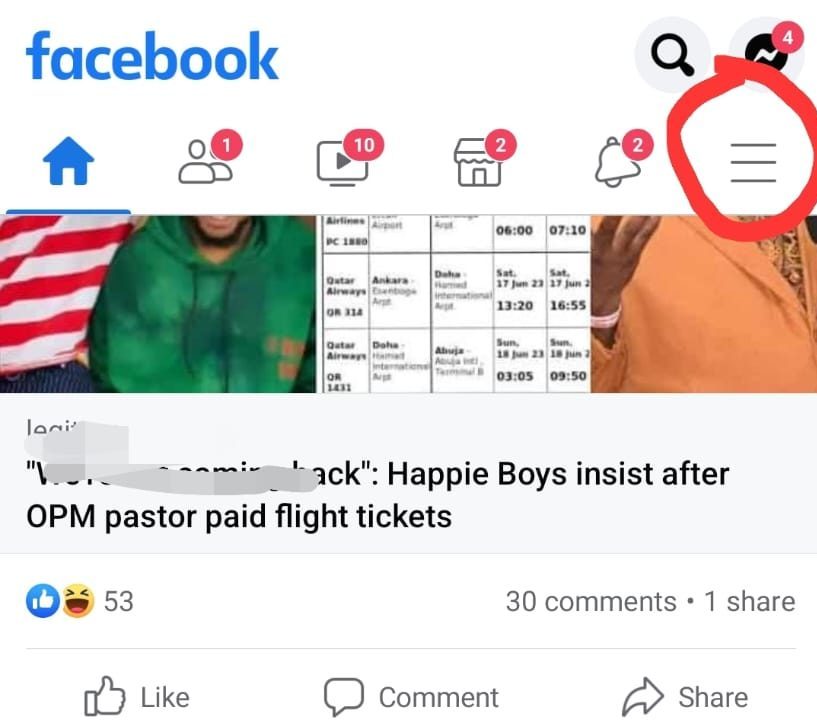
    1. Click on the hamburger Menu icon (three horizontal lines) in the top-right corner (Android) or bottom-right corner (iOS).

    Clear search history

    2. Scroll down and tap Settings & Privacy, then tap Settings.

    3. Tap Profile settings.

    View Blocked list


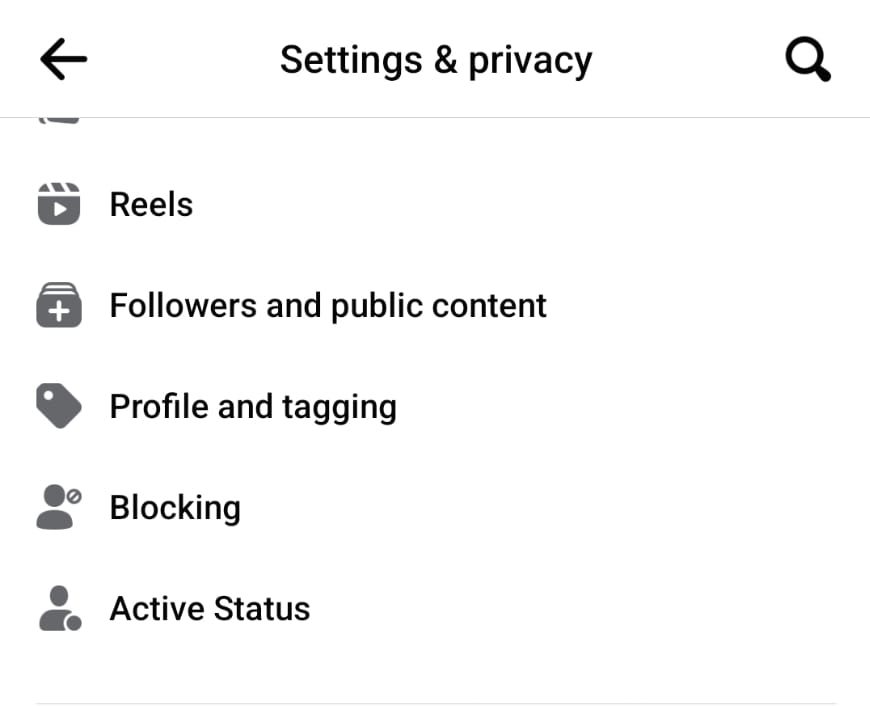
    4. Tap Blocking; you’ll see a list of the profiles you’ve blocked on Facebook.

    To unblock someone, click Unblock next to the name of the person you want to unblock. Then tap Unblock to finish unblocking the person.

    How to View a Blocked List of Friends on Facebook for PC or Facebook Web Version

    Follow the steps below to view your Facebook blocked list of friends:

    1. Tap your profile picture in the top right of your Facebook homepage.

    View blocked list

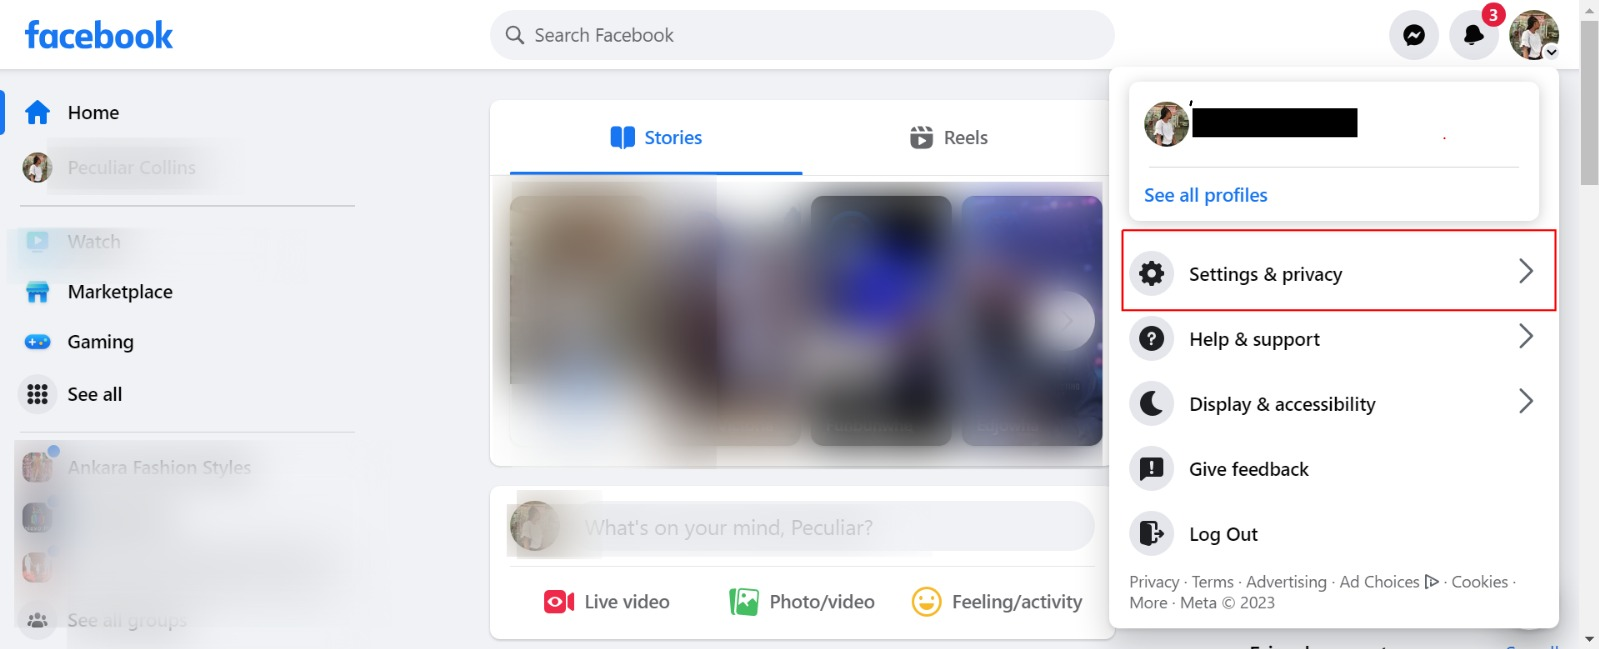
    2. Select Settings & Privacy, then click Settings.

    view blocked list

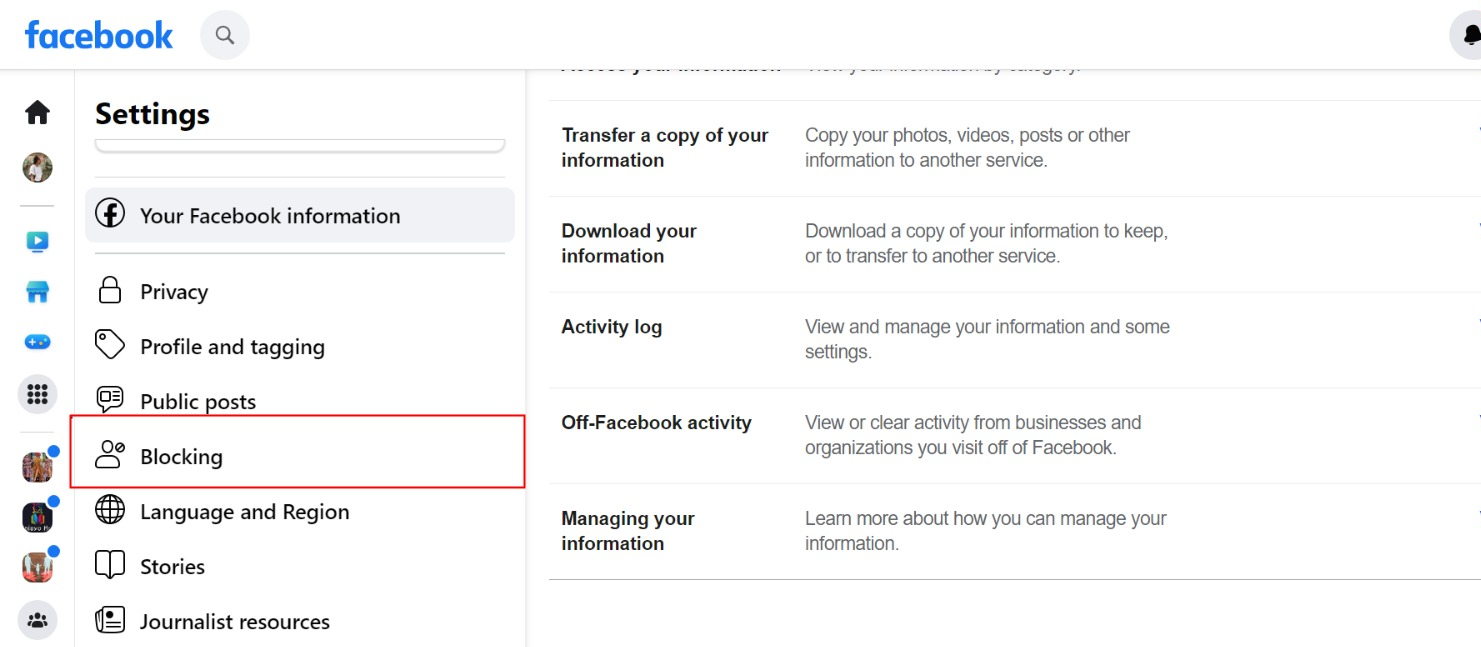
    3. On the left side, click Blocking.

    View blocked List

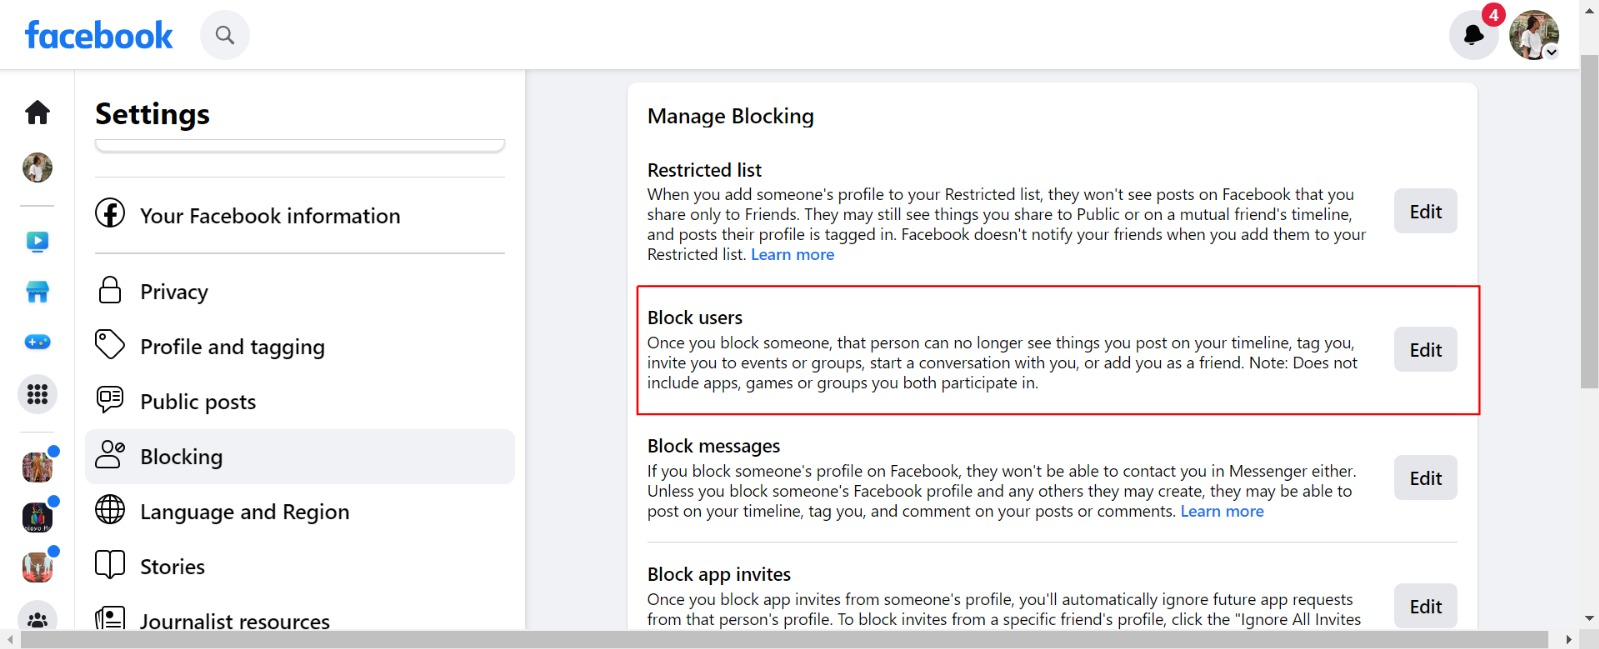
    4. In the Block users section, click Edit, then tap See your blocked list to see a list of profiles you’ve blocked on Facebook.

    Creating a Facebook profile is one thing; another is the usage. As you may have already noticed, often you add friends who turn out to be tergiversators or betrayers, which you may decide to block.

    Moreover, you often block someone mistakenly or due to an error and want to rectify it. It’s very easy; follow the steps below to unblock someone you blocked.

    Read more: How do I see a list of people I’ve blocked on Facebook?

    When you unblock someone, they can see public Facebook postings you make. Also, that person won’t instantly become a Facebook friend of yours. You will need to send a friend request to a previously blocked user once you have unblocked them.

    Please note that if you unblock someone, you won’t be able to block them again for a few days.

    How to Unblock Someone for PC or Facebook Web Version

    1. Tap your profile picture in the top right of your Facebook homepage.
    2. Select Settings & Privacy, then click Settings.
    3. In the left column of your Settings, click Blocking.
    4. In the Block users section, click Edit, then tap See your blocked list to see a list of profiles you’ve blocked on Facebook.
    5. Click Unblock next to the name of the person you want to unblock.
    6. Click Confirm to finish unblocking the person.

    Facebook is the world’s most popular social networking platform for sharing photos, news, inventions, and opinions. To connect with someone on Facebook, send them a friend request, which they can accept or decline.

    Blocking someone means you won’t be visible to that person anymore. Your blocked list of friends on Facebook can’t be accessed or viewed by your friends. Only you can view it.

    Is it still possible to tag someone who has blocked you?

    Imagine you want to send a meme to a friend. Normally, you’d tag them by typing their name and tapping their profile link. They’ll see the tag the next time they logged in.

    However, if that person has blocked you, you certainly aren’t going to tag them in any of your posts, including memes, images, and any postings you make to your (or someone else’s) Timeline.

    You can tag an unfriended Facebook user depending on their privacy settings. It also depends on the group setup; you can’t tag someone if they’re not in the private group.

    How to Check if you’ve been blocked on Facebook using the Search Function

    On Facebook, look for your friend. Log in and go to the site’s top left for the search field. Likewise, on the Fb application, you can know who has blocked you by searching for the person using the search bar at the top of your newsfeed.

    Then, a listing of all profiles and pages will be displayed. To change results, tap People. If you’re blocked, their profile will be hidden. If you search All, you may locate them even if they blocked you.

    If the user’s image shows, click it. If somebody unfriended you, you can still access their profile (though it depends on their security settings). If you’re blocked, nothing will load.

    How to Remove Someone From Facebook’s Blocked List

    First, you must unblock the person who has been blocked on Facebook. This will allow you to view his or her profile once more, allowing you to send another friend request.

    1. Log into Facebook and go to your Facebook Settings page to do so. Tap the hamburger icon (three horizontal lines) in the top-right corner of the Facebook homepage. Tap Settings & Privacy > Settings.

    2. Select the Blocking tab on the left side of the page. In the Block users section, click Edit, then tap See your blocked list to see a list of profiles you’ve blocked on Facebook.

    3. To remove someone from the blocked list, click Unblock next to someone’s name, and their profile will become available to you again.

    Block users cannot read your posts, tag you, talk with you, or make you a friend request. But you might still see that person if you’re in a group or playing the same game.

    Other block options, such as Block app invitations and Block event invites, can be found by scrolling down. You can use them to prevent somebody from sending you specific requests without entirely blocking or unfriending them.

    Photos and Blocking

    Blocking a person removes all their photo tags. If you tag a photo before sharing it, only the person’s face or likeness will remain. If you don’t upload the photo, the tag is limited.

    Even though the photo and name of the person will stay accessible, the tag will no longer connect you to their Timeline. The tag will remain active with a valid link to that member’s Timeline for those who haven’t blocked him/her.

    Alternatives to Photo Privacy

    You can alter the privacy of an individual photo or album to restrict its visibility and block it.

    Click the gear-shaped options icon in the lower-right corner of the album you want to restrict.

    To limit individual visibility for the album, use the “Don’t share this with…” option in the dialogue box.

    Individual photographs in your “Mobile Uploads,” “Profile Pictures,” and “Timeline Photos” albums can have their privacy settings changed.

    It’s worth noting that photos in the “Cover Photos” album must always be set to “Public.”

    Other Blocking Exceptions

    While blocking practically eliminates all relationships between two Facebook users, there are a few exceptions.

    You may still get messages from blocked people in your inbox and chat messages from group chats.

    Before or after blocking, either sort of message can be deleted.

    It’s possible that posts about mutual friends, such as those on that friend’s Timeline, will also be visible.

    Mutual group memberships, event invitations, games, and apps may allow you to see and engage with people you’ve blocked indirectly.

    What are the Alternatives to Blocking Someone on Facebook? 

    Apart from blocking someone from Facebook, there are other alternatives you can use to get a user off your news feed. These alternative options include unfriending, snoozing, and unfollowing the user. 

    How to Unfollow, Snooze and Unfriend Someone on Facebook

    Here is how to unfollow, unfriend and snooze a Facebook user who is no longer needed: 

    Unfollow 

    To unfollow a Facebook user, select one of the user’s posts, then click on the three dots in the upper right corner. You will find the unfollow option. Doing this will remove the users’ updates from your news feed, but you can also remain in communication with them. 

    Snooze

    Snoozing is straightforward. All you need to do is locate the three hamburger symbols in the right corner of the users’ posts and select Snooze (user name) for 30 days. Once enabled, you will be visible on their news feed and friend list but won’t be able to access their post for a month. 

    Unfriend

    Unfriending is also very easy. I bet you know how to unfriend a user, but I will explain it for the purpose of this article.  

    All you need to do here is visit the user’s profile. Once you are on the profile, you will see the “Friends” button, which indicates that you are both friends on Facebook. Just click on that button to unfriend the user. 

    View Blocked list of Friends on Facebook FAQ

    How do I see a list of people I’ve blocked on Facebook?

    To find the users you have blocked, follow the steps below:

    • On the upper right side of Facebook, tap account.
    • Then, under Settings & Privacy, tap Settings.
    • Select Blocking from the option on the left.

    In the Block users section, click Edit, then tap See your blocked list to see a list of profiles you’ve blocked on Facebook. You can do the following from there:

    • Unblock someone.
    • Unblock the user you want to unblock by tapping the Unblock button next to their name.
    • Block someone.
    • Blocking someone is as simple as typing their name into the text field, tapping Block, and then picking Block [name].

    Where is your blocked list on Facebook 2024?

    Locate and click the hamburger icon (three horizontal lines) on the Facebook Homepage. Scroll down and tap Settings & Privacy, then tap Settings. Tap Profile settings. Tap Blocking; you’ll see a list of the profiles you’ve blocked on Facebook.

    How can I access my Facebook Messenger blocked list?

    Open the Messenger application on your smartphone. In the upper left corner of Chats, select your profile photo. Select Privacy from the menu. Next, select People > Blocked users.

    What happens if you block a Facebook friend?

    When you block someone, they won’t be permitted to access your Timeline anymore. They cannot access what you post on your status, tag you, offer you an invitation, contact you, or initiate a chat with you. You can also unfriend them if you are currently friends with them.

    What Is the Difference Between Being Blocked and Being Unfriended?

    Unfriending is a feature that allows you to delete someone from your friends list without informing them. You’ll still be allowed to access his or her profile and posts.

    Blocking allows you to fully disengage from the users you’re blocking, making you both inaccessible on Facebook.

    So, if you unfriend someone, you may still see their profile, comments on shared pages, and anything else they’ve made public.

    You will be unable to view someone’s profile if they have blocked your account. You will also be unable to access any comments, chats, or updates.

    We hope you find this information helpful. Please use any of the share buttons below to share this information.

    Feel free to drop any questions regarding this article in the comment section below.

not allowed